
A Guide to Timelapse Videos
In this guide to timelapse videos we’ll look at what timelapse is, how the process works and some key requirements that need to be taken into consideration.
A brief introduction to timelapse
Timelapse is a photography technique that enables you to condense hours, days, months or even years down to a matter of seconds. Timelapse videos are great to document a construction projects that take years to complete and they can also be used to add visual interest and a creative edge to a corporate video or promotional film by condensing, say a sunset or the tide coming in, even an ice cream melting!
The different types of timelapse
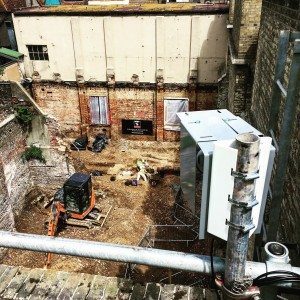
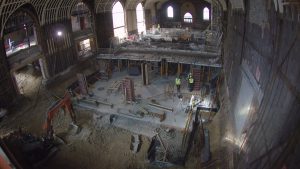
Timelapse for a construction project would be classed as a long term installation. This is where a weatherproof camera is fixed to a secure structure on or near to the site and it is connected to a 4G router so it and the photos can be accessed off-site. These can run for a short period of time like a month or for years, depending on the length of the construction project. Using the 4G network also enables us to offer our timelapse video production service to much more remote areas.
A short term timelapse would be similar to the above but only last a matter of weeks. The choice of camera would depend on the location and project but a long term solution could be adapted to work or a DSLR camera may be more suitable.
 A timelapse of a sunset for example would be a creative timelapse and would be captured with a DSLR camera on a tripod or a motion control system to add movement and further increase the shots visual impact. These would usually not last longer than a few hours or a day. These timelapse shots can be of all sorts, as long as there is movement timelapse will generally work. If you want to take it one step further you can also shoot timelapse with a very slow shutter speed so that the object that is moving appears blurred. This works well for people moving around a park or along a street as it make them appear like a river.
How to decide which you need
Any timelapse provider will be able to help you with this but it all comes down to how long the process that needs to be captured will last. If you can give the video production company a detailed description of the project they will then be able to put forward the best solution.
How the technology works
As I briefly mentioned above, long term timelapse systems should have remote access functionality as it reduces the risk of drop-out substantially. If a project lasts two years a company isn’t going to be available at all times to visit the site and check on the equipment. With remote access the camera functions can be checked and tweaked from anywhere and the photos can be screened and downloaded. If there is an issue with the system it can be picked up very quickly and acted upon.
The camera is programmed to take a photo at a certain interval, on any given day between two time points. Our most common setup is a photo every 10 minutes, Monday-Friday, 8am – 6pm. Once the photo has been taken it is then uploaded to our cloud account via the 4G network. Once there we can then access the photos and download them to our edit suite and begin editing.
A short term timelapse would generally be a simpler setup where the camera will be controlled by an intervalometer and the photos stored on the camera’s memory card. This option is used because it’s substantially cheaper than a long term installation and the jobs are generally local so the camera can be checked regularly.
 A creative timelapse takes a little more thought to work out the photo intervals. You need to work out how long the final sequence needs to be and then balance that with the duration and speed of the event/object. Once that has been worked out we would then frame the shot and leave the camera to click away for how ever long the event is. We don’t leave the camera during this time so a good book is always a good idea! If the brief requires a motion control system or a long shutter speed then it takes a little longer to setup because the complexity increases. You need to ensure the photo interval is long enough for the long shutter speed and processing time and when using motion control systems you need to set the in and out points for the movement and program length of time the movement should take.
What to consider
When installing a long term timelapse system there are several things to consider –
- The mounting point – we need to make sure the camera won’t get in the way and that the mounting point is stable. There is nothing worse than having to move a camera after 12 months because it is in the way of the builders!
- The sites position – This is so we can try an minimise sun flare on the lens and face the camera away from prevailing winds.
- Power – The control box will need constant power so this is important to consider. Solar panels or batteries could be added if required but they also increase the cost.
- The cable run – The camera and control box are connected by an outdoor ethernet cable (up to 100 metres) which will need to be run carefully to ensure it doesn’t get damaged.
- 4G/5G connectivity in the area – If the 4G signal is a little weak you can look to install an on-site backup drive so if the 4G drops out temporarily the photos will still be saved.
- Working hours – There is no point having the camera taking pictures if there is nothing to see, so this information is handy to know at the beginning of the project.
Things to consider for creative timelapse sequences –
- The weather – Unless rain is a feature in the timelapse shot it always best to choose a sunny day with white clouds moving overhead as they will create a lovely movement in the final video.
- Location – We need to make sure that the location chosen doesn’t interrupt any activities as we can’t move once we have started.
- Logistics – This is particularly important if a large motion control system is required. Some of them can be quite difficult and heavy to carry.
- The event or object – The timings of the event or passing object need to be known well in advance so setup time can be considered. There is nothing worse than capturing an incomplete event.
What happens once the camera is up and running
Once the camera is up and running it’s just a case of monitoring it and responding to any issues. At the end of each month the photos from that month are downloaded from the cloud and backed-up ready for the post-production stage.
Extra options that can be included
If you have a long term timelapse system installed you might want to explore the option of an online viewing portal. This gives you a secure login so you can keep track of the construction or whatever it may be. This can be very helpful as it can reduce the amount of trips needed to site and it can help to keep any stakeholders fully up to date with progress.
Editing the sequences
Once the timelapse system has captured all the images it is time to begin the editing stage. This is where we take the image sequence, which will be made up of thousands of images and turn it in to a conventional video file that can be edited like any other type of video. Depending on the brief, the resulting video clip may be the finished video or it could be used in a more in depth video with interviews, cutaways and animations.
I hope this guide has been useful and you know feel more comfortable about approaching a timelapse provider. If you would like to discuss your project with us please don’t hesitate to call Will or Andy on 07968 335527 // 07816 320414 or email them.
To keep up to date with Echo please check us out on Instagram.